The difference between a stunning moose photograph and a life-threatening incident in Algonquin Park lies not in your camera gear, but in your risk-assessment mindset.
- Understanding moose body language is non-negotiable; confusing a warning for an invitation is a critical error.
- Your greatest safety tool is distance, enabled by the right optics and a deep respect for the animal’s space.
- The most dangerous encounters often happen on Highway 60, where seasonal factors and time of day dramatically increase collision risks.
Recommendation: Shift your goal from simply “getting the shot” to mastering the art of safe observation. Treat situational awareness as the most professional skill in your toolkit.
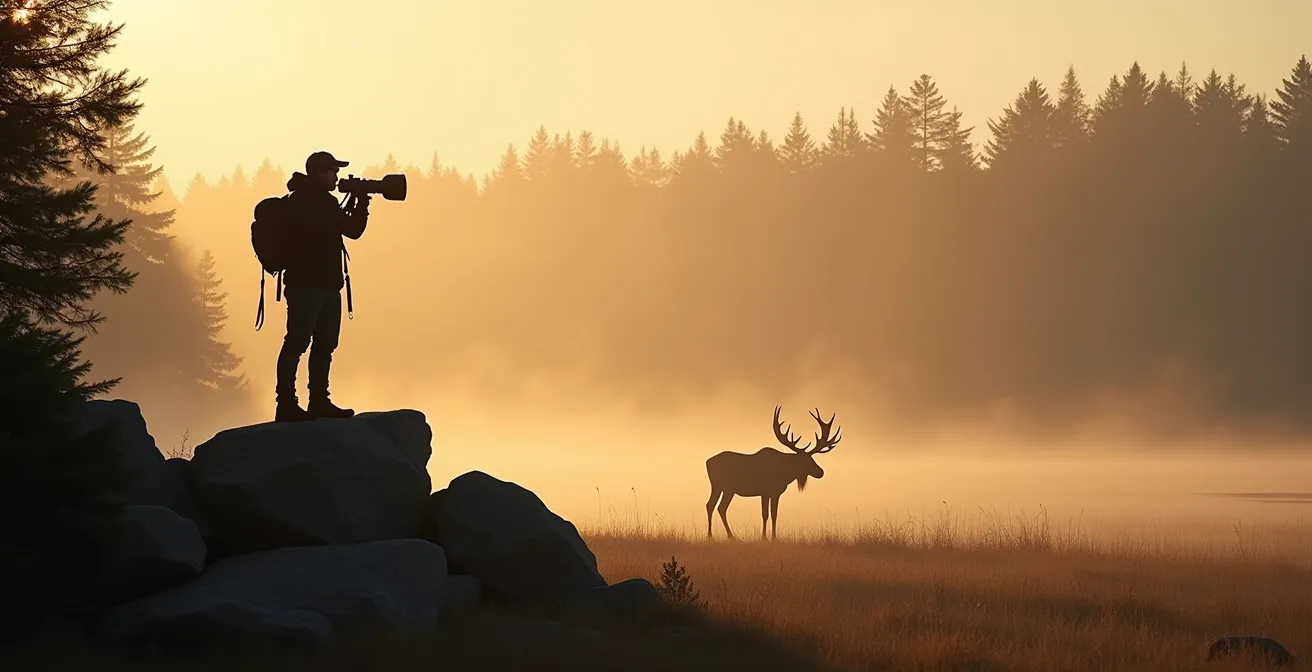
For any wildlife photographer, the moment a bull moose steps out of the dense Algonquin forest is pure magic. The sheer scale of the animal, the steam of its breath in the crisp morning air, the glint of light on its antlers—it’s the shot you’ve driven hours for. Your first instinct is to raise the camera, zoom in, and capture that raw power. But in that critical moment, another instinct must take over: the one focused on survival. Too many amateur photographers, driven by the desire for a once-in-a-lifetime image, make predictable and dangerous mistakes.
The common advice is simple: keep your distance, use a telephoto lens, don’t feed the animals. While true, this is dangerously incomplete. It treats the encounter like a static checklist, ignoring the dynamic reality of a 1,500-pound wild animal and the complex environment of the Canadian Shield. These rules tell you *what* to do, but they fail to teach you *how to think*—how to read the subtle cues in an animal’s posture, how to assess the environmental risks beyond the animal itself, and how to manage your own adrenaline-fueled decision-making.
This guide offers a different perspective. We’re moving beyond the basic rules to instill a professional’s mindset of situational awareness. The true key to safely and ethically photographing moose isn’t about being fearless; it’s about being intelligent. It’s about understanding that the animal, the environment, and your own behaviour are all part of a single, interconnected system. Mastering this system is what separates a fleeting snapshot from a lifetime of incredible, responsible photography.
Throughout this article, we will deconstruct the critical elements of safe wildlife photography in Algonquin Park. We will analyze animal behaviour, evaluate gear choices through a safety lens, dissect high-risk environments, and establish protocols for every aspect of your trip, from driving to camping. This is your roadmap to not only getting the shot, but earning it.
Summary: Photographing Algonquin’s Moose: A Guide to Getting the Shot—and Getting Home Safe
- Bluff Charge vs. Predatory Stalking: How to Tell the Difference in Seconds?
- Binoculars vs. Spotting Scope: Which Is Best for Wolf Watching in Lamar Valley?
- When to Avoid Highway 60 to Miss the Moose-Vehicle Collision Peak?
- Why Feeding a Whiskey Jack Could Kill It During Winter?
- The Bear Spray Mistake That Could Cost Your Life on a Solo Hike
- The “Bare Campsite” Rule: How to Store Food Where Wolves Roam?
- How to Choose a Tent Site That Won’t Flood During a Sudden Storm?
- How to Pack Food for the West Coast Trail to Avoid Pack Weight Fatigue?
Bluff Charge vs. Predatory Stalking: How to Tell the Difference in Seconds?
The most critical skill in moose photography is not technical, but interpretive. Your safety depends on your ability to accurately read a moose’s intentions in an instant. An amateur sees a big animal; a professional sees a complex set of signals. A moose doesn’t typically want a confrontation; its actions are designed to communicate a clear message: you are too close. Ignoring these warnings is the single most common path to a dangerous encounter. The difference between a “bluff charge”—a short, intimidating rush designed to scare you off—and a genuine attack is in the details.
Pay close attention to the ears and hackles. A curious or unconcerned moose will have its ears forward or swiveling to catch sounds. But if a moose flattens its ears back against its head and the long hairs on its neck and shoulders (the hackles) stand up, it is a clear and unambiguous sign of aggression. This is no longer a warning; it is a prelude to a charge. Another key differentiator is vocalization. A cow moose may emit a high-pitched whine to locate her calf, a sound that can be mistaken for distress. In contrast, a deep, guttural grunt from a bull is a territorial challenge. Understanding this behavioural interpretation is your first line of defense.
Never position yourself between a mother and her calf. This is a universal rule of wildlife photography that bears repeating, as it’s one of the fastest ways to provoke a defensive attack. Your responsibility is to maintain enough distance—a recommended minimum is 30 metres—so the animal never feels the need to give these warning signs in the first place. If you do see these signals, the protocol is immediate and absolute: back away slowly, speak in a calm voice, and do not turn your back or run. Running can trigger a chase response. Use trees or your vehicle as a potential barrier between you and the animal as you retreat.
Binoculars vs. Spotting Scope: Which Is Best for Wolf Watching in Lamar Valley?
While the title references Lamar Valley, the principle of choosing the right optics is universal and critical for safety in Algonquin Park. Your lens gets the shot, but your observation optics keep you safe. The goal is to study animal behaviour from a distance that poses zero threat, allowing you to decide if a closer, photographic approach is even possible. For the dense, forested environment of Algonquin, your choice of optic is a strategic one. As Parks Canada officials advise, you must always “Keep your distance and never position yourself between a mother and her calf.” Good optics make this possible without sacrificing a great viewing experience.
The primary trade-off is between field of view and magnification. Binoculars, particularly an 8×42 or 10×42 configuration, are often the superior choice for Algonquin’s landscape. The “8x” magnification is powerful enough for clear identification, while the “42mm” objective lens gathers ample light, which is crucial for spotting moose in the low-light conditions of dawn and dusk when they are most active. Most importantly, binoculars offer a wide field of view, allowing you to scan the tree line and spot animals you might otherwise miss. A spotting scope, with its higher magnification (20-60x), is designed for wide-open vistas like the tundra of Wapusk National Park or Lamar Valley, where the viewing distance is often over 500 meters. In Algonquin’s closer quarters, a spotting scope’s narrow field of view can be a disadvantage, making it harder to track a moving animal or be aware of your surroundings.
The following table, adapted from guidance for various Canadian parks, clarifies the best tool for the job based on environment.
| Park Type | Best Optic Choice | Key Features Needed | Viewing Distance |
|---|---|---|---|
| Algonquin Park (Dense Forest) | Binoculars 8×42 | Wide field of view, excellent low-light performance | 20-50 meters |
| Prince Albert (Lakes & Forest) | Binoculars 10×42 | Waterproof, nitrogen-purged | 50-100 meters |
| Wapusk (Open Tundra) | Spotting Scope 20-60x | Tripod-mounted, extreme cold resistance | 200-500 meters |
| Lamar Valley (Open Vista) | Spotting Scope 25-75x | High magnification, HD glass | 500+ meters |
Ultimately, the best optic is the one that allows you to respect the animal’s space. By using quality binoculars, you can enjoy a detailed observation from a safe distance, assess the situation, and then decide if it’s appropriate to set up for a photograph with your telephoto lens. Optics are your primary risk-mitigation tool.
When to Avoid Highway 60 to Miss the Moose-Vehicle Collision Peak?
The most dangerous place in Algonquin Park is not a remote trail but the 56-kilometre stretch of pavement that runs through it: Highway 60. For photographers, the roadside offers tempting, open sightlines. For moose, it presents a lethal threat and an unnatural temptation. Understanding the specific risks associated with this corridor is essential, as moose-vehicle collisions are frighteningly common. For instance, in one weekend alone, there can be 3 moose-vehicle collisions on Highway 60, a stark reminder of the constant danger. A tragic incident in May 2024 saw a woman sustain life-threatening injuries after hitting a moose, and remarkably, a responding ambulance also struck a moose, highlighting the extreme risk.
The danger is not uniform throughout the day or year. The most hazardous time is the period from 30 to 60 minutes after sunset. During this twilight window, moose are actively moving, but visibility is rapidly decreasing, creating a perfect storm for collisions. Your vehicle’s headlights create a limited field of vision, and the dark, towering body of a moose absorbs light, making it incredibly difficult to see until it’s too late. The risk is further magnified by season. In spring (May/June), moose are drawn to the roadside to lick salty residue left from winter road maintenance—an irresistible draw that puts them directly in the path of traffic. Conversely, the risk is highest during the late fall rut, when bull moose are unpredictable and may charge vehicles.
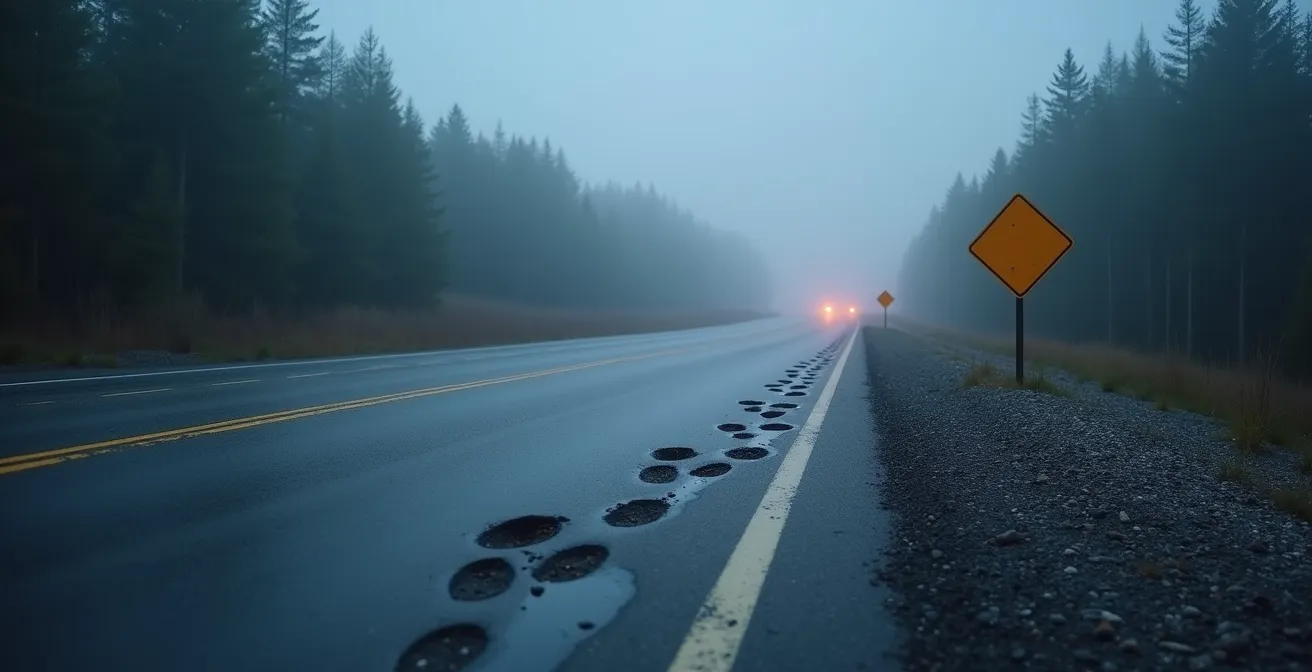
As a photographer, this means exercising extreme caution. Never stop in a live lane of traffic. If you spot a moose, pull over completely onto the shoulder in a safe, visible location and use your hazard lights. Be aware that other drivers may be fixated on the moose and not on your vehicle. Use your vehicle as a blind, shooting from inside or using it as a solid barrier between you and the animal. Remember that roadside moose are often habituated to cars but not to people on foot. Exiting your vehicle can trigger a completely different, more aggressive response.
Why Feeding a Whiskey Jack Could Kill It During Winter?
The ethos of a professional wildlife photographer extends beyond personal safety to the well-being of the animals themselves. One of the most violated rules in parks across Canada is the prohibition on feeding wildlife. The act may seem harmless, even kind—tossing a piece of a granola bar to a curious Canada Jay (colloquially known as a “Whiskey Jack”). However, this simple act can be a death sentence for the animal and carries severe legal consequences for you. Under the Canada National Parks Act, feeding wildlife can result in up to $25,000 in fines, a clear signal of the seriousness of the offense.
The harm is not always direct. For species like the Canada Jay, which survive harsh winters by caching thousands of food items, human food is a disaster. It lacks the specific nutritional profile they need and, more importantly, it spoils. A bird that fills its caches with perishable human food instead of natural, stable items like berries and insects may find its entire winter larder rotten when it needs it most, leading to starvation. You are not giving it a meal; you are potentially destroying its entire survival strategy.
The indirect consequences can be even more tragic. Consider this real-world case study from Algonquin Park.
The Cascading Effects of Human Interference
A family of Canada Jays, part of a long-term scientific study, were very likely lethally poisoned after ingesting medication that was illegally left out by a visitor attempting to treat a mange-infected fox. This heartbreaking incident, documented by researchers, shows how a misguided attempt to “help” one animal can have devastating, unforeseen consequences on another. The jays, habituated to scavenging human-provided items, saw the contaminated bait as just another handout, with fatal results.
This principle applies to all wildlife. Feeding animals habituates them to humans, leading them to approach people and vehicles, which increases their risk of being hit on roads or becoming “problem” animals that have to be relocated or destroyed. A fed animal is often a dead animal. Your role as an ethical photographer is to be an invisible observer, not an active participant. The best way to show your appreciation for wildlife is to let it remain wild.
The Bear Spray Mistake That Could Cost Your Life on a Solo Hike
While this guide focuses on moose, any trip into Algonquin’s backcountry requires preparation for all potential wildlife encounters, including black bears. Bear spray is an essential piece of safety equipment, but simply carrying it is not enough. A common and potentially fatal mistake is treating it as a magic talisman rather than a tool that requires practice and proper deployment. Its effectiveness is entirely dependent on your ability to access and use it in seconds under extreme stress.
The single biggest mistake is improper carrying. Bear spray buried in a backpack is useless. Even a hip holster can be too slow, taking 4-5 seconds to draw, by which time a charging animal has closed the distance. The professional standard is a chest holster. This position allows for the fastest possible draw (2-3 seconds) with either hand and keeps the canister secure and accessible at all times, even with a pack on. Muscle memory is key. You should practice drawing an inert training canister until the motion is automatic. In a high-stress encounter, you will not have time to think.
Another critical error is failing to account for wind. Bear spray is an aerosolized irritant (capsaicin), and deploying it into a strong headwind will incapacitate you, not the animal. Before you even consider spraying, you must instinctively check the wind—a quick glance at moving vegetation or dropping a pinch of dirt will do. The correct technique is to aim slightly downward toward the charging animal, creating a wide cloud or “wall” of spray that it must pass through. Don’t empty the can in one go. Start with a 1-2 second burst to create the barrier and assess the animal’s reaction. This conserves spray for a follow-up burst if the animal continues to advance.
Finally, ensure your spray is valid. Canisters have an expiry date (typically 3-4 years) because the propellant can lose pressure over time. An expired can may not spray with enough force or distance to be effective. Check the date at the start of every season, and only purchase bear spray from licensed Canadian retailers like MEC or Atmosphere, as importing it from the US is subject to restrictions.
The “Bare Campsite” Rule: How to Store Food Where Wolves Roam?
Your responsibility for safe wildlife interaction doesn’t end when you put the camera away. It extends 24/7, especially at your campsite. The “Bare Campsite” rule is a cornerstone of backcountry safety in Algonquin Park, not just for bears, but for the park’s wolves and other inquisitive creatures. The goal is to leave no trace and offer no temptation. This means every single item with a scent—not just food, but toiletries like toothpaste, deodorant, and sunscreen—must be securely stored.
The storage method depends entirely on your type of camping. For car campers in designated frontcountry sites, the solution is simple: store everything in the trunk of a hard-sided vehicle. Never store food in a tent or a soft-top vehicle. For backcountry canoeists and hikers, the challenge is greater. Algonquin Park’s official guidelines are clear. As their safety literature states, “Wolves have a different, more curious nature than bears and may investigate scents that a bear might ignore.” This heightened curiosity demands meticulous food discipline.
Backcountry sites often provide bear poles or cables for hanging food. Your food pack must be hoisted at least 4 meters (13 feet) off the ground and 1.5 meters (5 feet) away from the tree trunk. However, the most effective and increasingly popular method for canoe camping is a dedicated food barrel. These rigid, waterproof containers are far more resistant to curious animals than a soft dry bag.
| Container Type | Best For | Pros | Cons |
|---|---|---|---|
| Food Barrel (60L) | Canoe Camping | Waterproof, floats, wolf-resistant | Heavy, bulky for portaging |
| Dry Bag | Short trips | Lightweight, packable | Not animal-proof, requires hanging |
| Bear Canister | Backcountry hiking | Certified bear-proof, portable | Limited capacity, expensive |
| Vehicle Trunk | Car camping | Convenient, secure | Only for frontcountry sites |
No matter the method, all cooking and eating should be done well away from your tent. This creates separate zones for sleeping and eating, reducing the chance that an animal drawn in by lingering food smells will stumble upon your tent at night. In the event your food storage is ever compromised by wildlife, you must report it to the Park Wardens immediately.
How to Choose a Tent Site That Won’t Flood During a Sudden Storm?
A professional’s situational awareness extends beyond animal threats to environmental ones. A spectacular day of moose photography can be ruined—or made dangerous—by a sudden summer storm. Choosing a tent site is not about finding the flattest spot; it’s about reading the micro-topography of the Canadian Shield to anticipate the flow of water. A poorly chosen site can leave you and your expensive camera gear submerged in minutes.
The key is to think like water. Look for slightly elevated ground. A gentle slope is your friend. In Algonquin, this often means looking for a spot on a granite outcrop rather than a soft, vegetated depression. Depressions, while seemingly sheltered, are natural collection points for rainwater. Before setting up, take a moment to look for signs of previous water flow: matted leaves, scoured-out channels in the soil, or darker, damp-looking ground. These are all red flags. As experienced campers know, spring conditions in Algonquin can feel like winter due to higher elevations, with ice on lakes remaining until the last week of April or first week of May, which creates unique drainage challenges as snowmelt combines with rain.
Beyond elevation, consider your proximity to water bodies. A picturesque spot right on the lake’s edge is beautiful, but it’s also the first place to flood if the water level rises quickly during a downpour. Position your tent at least 30 meters (100 feet) from the shoreline. Also, look up. Scan for “widowmakers”—dead or broken tree branches hanging overhead that could be brought down by high winds. Your perfect spot is on durable, high ground, with good drainage, away from the water’s edge, and clear of overhead hazards.
5-Minute Storm Prep Drill
- Trenching: Dig a small uphill diversion trench (where permitted) to redirect surface water flow around your tent.
- Guylines: Slacken all guylines by 2-3 inches to allow the fabric to shrink when wet and prevent wind stress from snapping poles.
- Gear Security: Secure all loose gear (packs, boots, cooking equipment) under a waterproof tarp or in vestibules, weighing it down with rocks.
- Hazard Check: Do a final check for any “widowmakers” (dead standing trees or branches) within falling distance and be prepared to relocate if a significant threat exists.
- Orientation: Ensure your tent door is positioned away from the prevailing wind direction and that the rain fly is fully staked out and taut.
Key Takeaways
- Situational Awareness is Paramount: Your safety relies more on your ability to read animal behaviour and environmental cues than on your camera equipment.
- Distance is Your Best Tool: Use quality optics to maintain a respectful and safe distance from wildlife at all times. Never sacrifice safety for a closer shot.
- Practice Proactive Prevention: From food storage to campsite selection, the best way to handle a dangerous situation is to prevent it from happening in the first place.
How to Pack Food for the West Coast Trail to Avoid Pack Weight Fatigue?
While the West Coast Trail is a different journey, the core principle of managing pack weight and energy is universal for any serious backcountry photographer, including those exploring Algonquin’s interior. Fatigue is a major safety risk. A tired photographer makes poor decisions, takes shortcuts, and has slower reaction times. Your physical endurance is the foundation of your mental acuity and situational awareness. The key to managing fatigue is packing smart, and that starts with food.
The goal is to maximize calorie density—getting the most energy for the least weight. Foods like olive oil, nut butters, and high-quality dehydrated meals provide far more calories per gram than fresh foods or simple carbohydrates. For a multi-day photography expedition where you’re carrying a heavy camera body, multiple lenses, and a tripod, every gram counts. Repackaging all your food out of its bulky commercial containers and into labeled zip-top or vacuum-sealed bags is a non-negotiable step to save space and weight.
This table illustrates the dramatic difference in weight required to achieve a day’s worth of calories (e.g., 3000) from various food types. Notice how a diet rich in fats (olive oil, peanut butter) and quality dehydrated foods can save you hundreds of grams per day—kilograms over a week-long trip.
| Food Item | Calories/100g | Weight for 3000 cal/day | Available at MEC/Atmosphere |
|---|---|---|---|
| Freeze-dried meals (Alpine Aire) | 450 | 667g | Yes |
| Trail mix with chocolate | 525 | 571g | Yes |
| Peanut butter powder | 575 | 522g | Yes |
| Olive oil (for cooking) | 884 | 339g | No – grocery store |
| Energy bars (Clif Bar) | 380 | 789g | Yes |
Hydration is the other side of the energy coin. Carry a reliable water filter or treatment system and know where water sources are located. Carrying all the water you need for a full day is excessively heavy. Plan to treat water from Algonquin’s many lakes and streams to stay hydrated without the weight penalty. By carefully planning your nutrition and hydration, you ensure you have the physical and mental energy to stay sharp, make safe decisions, and be ready when that perfect photographic moment arrives.
By adopting this holistic, professional mindset—viewing safety, ethics, and environmental awareness as integral parts of the artistic process—you transform your relationship with wildlife. You cease to be a mere tourist with a camera and become a true naturalist and photographer, capable of capturing breathtaking images while leaving nothing but footprints. This is the path to a long, rewarding, and safe life in wildlife photography.